


Google Tag Manager: How to Integrate Lengow Tracking
20/12/16
4'
Google Tag Manager lets you centralise all of your marketing tags across a single platform. Let’s take a look at how you can set up the Lengow tracking in Tag Manager.
What is Google Tag Manager?
Launched by Google in 2012, Google Tag Manager gives you the ability to manage all your tags from a single interface that is accessible to everyone. To do this, you need to insert a single tag, generated by Google, into the code of your online store and then insert your tags directly from the interface. After this, you can freely control your tags without having to change the code on your site.
Before setting up Google Tag Manager in your online store, make sure that the tags already on your site aren’t the same as those that you want to add within the tag manager. So be sure to delete your old tags so that your results are accurate.
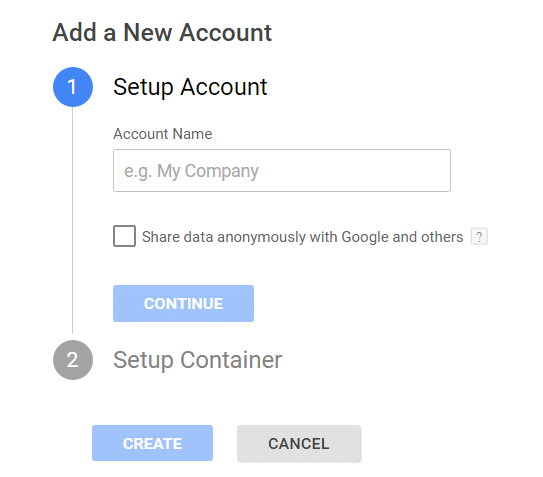
If you do not have a Google Tag Manager account, go to the Google site to register! You must then create your account (name of your e-commerce site) and set up the container (the URL of your e-commerce site).
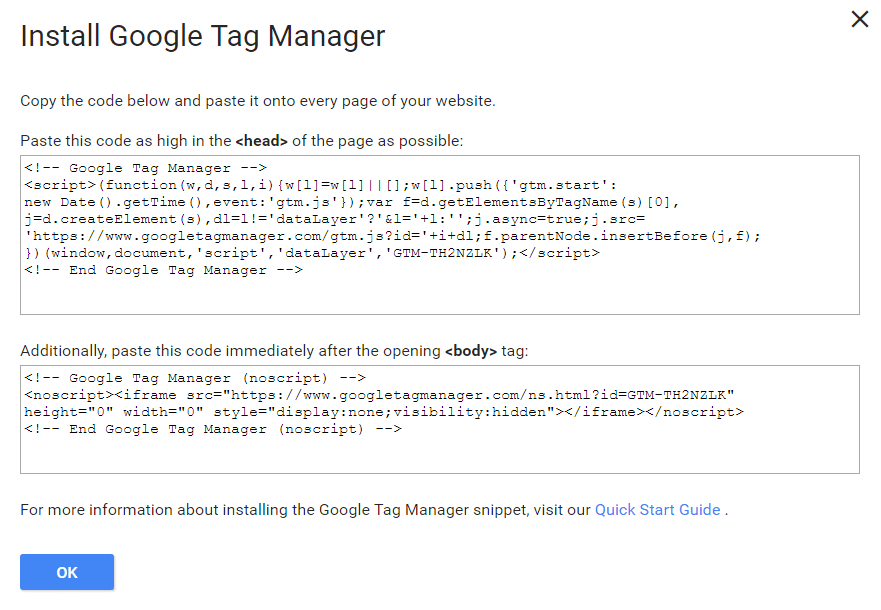
When creating this container, the tool will generate a snippet of code that you will have to add to all the pages of your online shop: in the <head> and <footer> section of the page and after the tag opening <body>.
Once you’ve created your Google Tag Manager account, you can also add pre-existing tags such as Google Analytics, Google AdWords, AdRoll, Bing, or personalised ones such as Lengow tracking.
So how do I add my Lengow tracking in Google Tag Manager?
To show you how to set up a custom tag in Tag Manager, let’s take the Lengow tracking as an example. To add this tracking in Google Tag Manager, simply follow these steps.
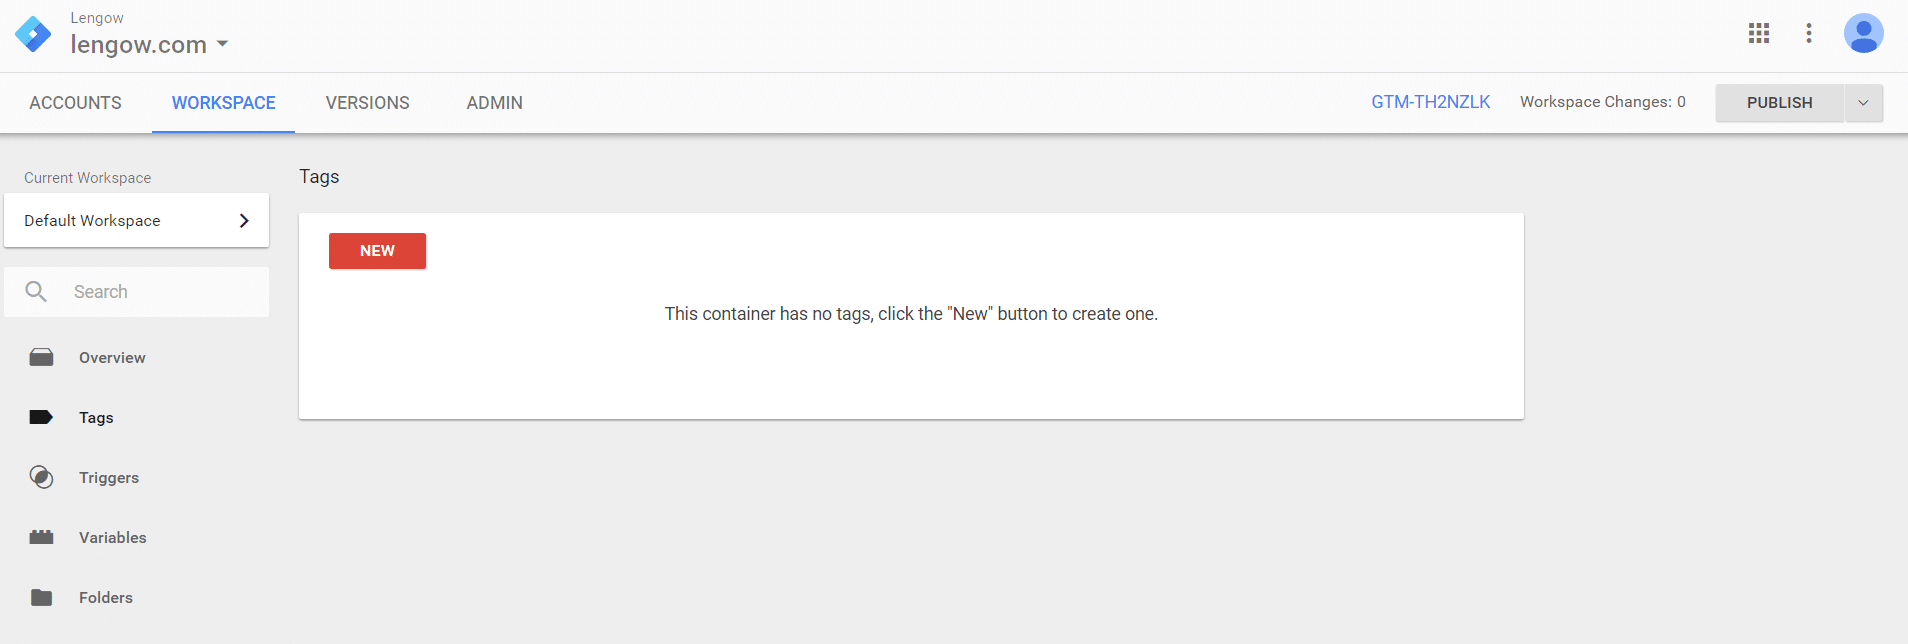
1.) Create your tag
To create your tag, click on ‘New’ in the ‘Tags’ section. To find it again easily next time, we recommend you name it ‘Lengow’.
2.) Set up your tag and trigger it
To configure your ‘Lengow’ tag, you must select ‘Custom HTML Tag’ to add the code to the ‘Tag Configuration’ location. To obtain this code, please visit our Help Center.
Note: Please check the box ‘Compatible with document.write’.
Then click on ‘Advanced Settings’. In ‘Tag Trigger Options’, select ‘Once per Page’.
To set the trigger for your tag, select the ‘All Pages’ trigger.
Once you have done this, save the tag you just created and proceed to the next step.
3.) Set up the Data Layer object
The Data Layer is an object that you must set up in the source code of your e-commerce site. This object contains all the information you want to communicate to Google Tag Manager, such as the behaviour of shoppers on your online store (depending on the type of device used) or the transactions made on your site.
The Data Layer object consists of variables defined by pairs of names and values. The code for your data layer is added as follows: <script> dataLayer = []; </ script>. It must be inserted before the Google Manager tag and on all the pages of your site necessary for the Lengow Tag application.
If a Data Layer has already been set up on your e-commerce site, make sure that the code data is up-to-date in order to have all the Lengow variables available. On the other hand, if you do not already have one, here are some examples of variables recommended by Lengow: page title, user account ID, order amount, payment method, etc. Check out the list of variables in our Help Centre.
Note: We advise you to entrust the integration of the data layer object to your developer. Learn how to add a layer of data to your site by visiting the Google Tag Manager Developer’s Guide.
4.) Define your variables
Once your variables are defined in the data layer object on your e-commerce site, you will then have to match them with those of Google Tag Manager. Go to the ‘Variables’ section of the platform, click ‘New’ and then select ‘DataLayer Variable’ as the variable type.
Please note that it is important that the name of your variable is the same as the one found in the Google Tag Manager script that you added to your site. Additionally, the name of the ‘Data Layer Variable’ must be the same as the name that was added in the Data Layer script.
Example: If you have named your ‘pageTitle’ variable in your script, then you must name the data layer variable ‘pageTitle’ too.
5.) Preview, debug, and publish
To check the correct functioning of your tag before publication, we advise you check it before hand in the Preview section. Once this step is completed, you can then publish your tag to activate Lengow tracking on your e-commerce site. Do not hesitate to visit the Google Help Center for more information about Tag Manager.
5 Ways Tag Manager benefits your business
1 / The centralisation of tags makes managing them a lot easier.
2 / Little technical skill is required and it gives autonomy to marketing teams.
3 / Saves you time, allowing you to focus more on campaigns and budgets.
4 / A library providing a list of tags is already available on the platform, simplifying the process further.
5 / Different user access levels are available for better security of the actions carried out.
Are you already a customer and would like to know more about setting up Lengow tracking with Google Tag Manager? Go to our HelpCenter.
Not yet a customer? Don’t wait any longer – ask for a free demo!
Your e-commerce library
Clarins x NetMonitor Success Story
Learn moreSuccess on Marketplaces
Learn moreCompetitive Intelligence
Learn moreSign up for our newsletter
By submitting this form you authorize Lengow to process your data for the purpose of sending you Lengow newsletters . You have the right to access, rectify and delete this data, to oppose its processing, to limit its use, to render it portable and to define the guidelines relating to its fate in the event of death. You can exercise these rights at any time by writing to dpo@lengow.com

Trending Posts
Marketplaces
The Top 10 Marketplaces in Europe (2026)
The e-commerce scene is a vibrant mix of marketplaces in Europe. These aren't just websites; they're bustling hubs where millions…
02/01/26
8'
Marketing channels
ChatGPT Ads and advertising on GenAI Search Engines: what you need to know
Advertising on generative AI-based search engines (GenAI) marks a new era in digital marketing. After two decades dominated by traditional…
18/01/26
8'
Marketplaces
The French Marketplace Landscape: What Brands Need to Know
France has quietly become Europe's marketplace laboratory. Lengow's exclusive ranking reveals why traditional retailers, not tech giants, dominate the game.…
08/01/26
6'
E-commerce Trends
Google’s Universal Commerce Protocol: The End of E-Commerce as We Know It?
On January 11, 2026, at the NRF Retail's Big Show in New York, Google unveiled the Universal Commerce Protocol (UCP),…
16/01/26
6'
Marketing channels
What the World Is Unboxing on TikTok and Instagram (Haul & Unboxing Index 2025)
Opening a package on camera has become much more than simple entertainment. In 2026, "haul" and "unboxing" videos serve as…
20/01/26
7'